

Welcome to week three of the Stitch Magic Stitch-Along! My apologies for the delayed post this week. I’m writing to you from lovely Cleveland, where I’m filming an episode of a PBS sewing show.
Today we’re talking about pleating, which begins on page 41 of Stitch Magic by Alison Reid. But first, a note: the author uses the terms pleats and tucks to apply to her own techniques, which are gorgeous (like the beautiful throw pillows pictured above). In the sewing community, there have been downright impassioned discussions about the difference in terms. For this sew-along, don’t worry too much about what the “proper” terminology is, but rather focus on how the author utilizes the techniques in her own designs—and how you can customize them for yourself!
Okay, let's dive in. Pleating requires very precise marking and folding, so I’ve only gone over two design samples this week. There are several more techniques in the book to try; I especially like the origami box pleats, shown below.

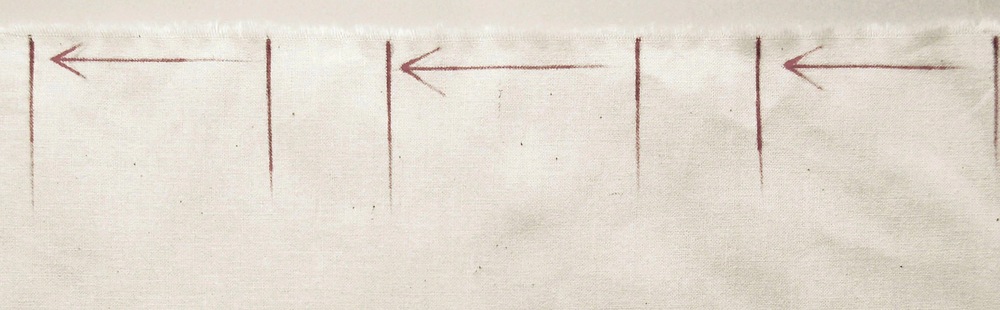
We’re going to start out with knife pleats, which are flat pleats that are generally uniform in size. Each pleat takes up three times its width. So, for a one-inch pleat, you need to allow yourself three inches of fabric. Make sense?
Start by marking your pleat lines. Mark two-inch pleat sections one inch away form each other. Mark them on the bottom of the fabric as well. Bring one pleat line to the other and pin in place.
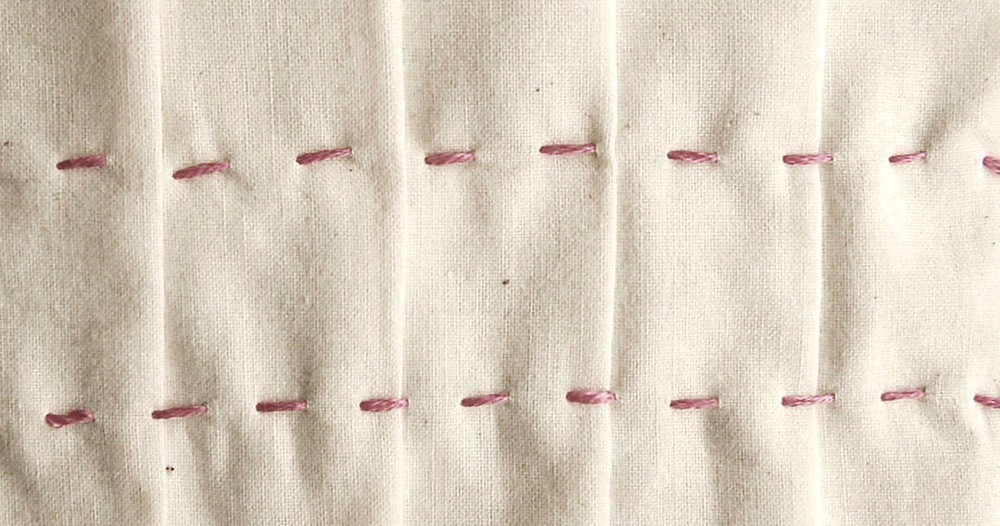
To retain the soft, sculptural feel of the pleats, we’re not going to press our sample. (If you want crisper pleats, go ahead and press them.) Now take some six-strand embroidery thread and stitch the pleats down in incremental lines with running stitches.
It’s hard to get a straight line, so mark your fabric with disappearing ink or some sort of tape that doesn’t leave a residue. Masking tape has worked well for me; you might also want to look for Tiger Tape, a quilting notion that has incremental stitch marks along a tape that doesn’t leave any gunk on your fabric. Genius!
Now let’s try another technique. This is a sort of grid, with small projecting pleats in both the horizontal and vertical directions.
Make ¼” pleat marks on your fabric. The pleat marks should be 1-1/4” away from each other.

Fold and pin the vertical pleats. Now, stitch along the side of the pleat that isn’t folded. Next, do the same with the horizontal pleats. But! When you stitch the sections that intersect, pull back the little flap to form a sculptural detail. Your presser foot will want to do this naturally anyway, so you’ll only need to help it along a bit.

My sample got a little crooked at points (See? Marking well is so important!) but I still like how it looks. In fact, it reminds me of the bodice of a designer dress I saw recently. Zac Posen, anyone?
I hope you’ve enjoyed a look at Stitch Magic’s pleating techniques! Next week we’ll be trying cording, which is completely new to me. If you can, get yourself a cording or braiding foot for your machine. This isn’t crucial though—methods with a regular presser foot as well as hand stitches will be shown.